Showing posts with label Tim. Show all posts

Thursday, January 15, 2015

Valentine Treat Jar

  
Hello my friends. As some of you know I got some new embossing powders yesterday on a shopping trip to Tuesday Morning. They were half off and they had some colors I did not own. I came home and try them out and was very satisfied. I had seen Tammy Tutterow do a glass votive jar a couple of times for the holiday seasons. I had also seen Wendy Vecchi play around with using alcohol ink on glass and metal. Now it was my turn.


I had a canning jar and decided to turn it into a treats jar for Valentine's Day. 
I sponged on some red geranium archival ink and embossed with the magenta ranger embossing powder. I spent a little time wiping the powder off the raised embossed  areas of the glass. I wanted to show the texture and thought it might work as a votive glass later. 

I created a tag for the label space on the front of the jar.
I stained some ribbon using Distress ink picked raspberry and spun sugar. 

Using a die from Tailored Expressions I cut the bird image from some DCWV shimmer paper and layered it on a piece of white card stock that had the edges distressed with picked raspberry Ink. 


Using the pinecone die from Tim Holtz's collection I created the rose decoration for the front. This was topped off with a Wink of Stella glitter pen.
Overall I'm pretty happy with how it turned out. I have a few ideas about what I will do next time. Thanks for stopping by.

Sunday, December 14, 2014

Holiday Preparation

Hello friends, 
One of my all-time favorite stamp companys is Stampers Anonymous. Among their collections are Tim Holtz's goodies. Today I finally finished Christmas cards and mailed them out so I thought I'd show you a few featuring some of these stamps. I used the Christmas blueprints collection. I hope you enjoy them. They were fun to make. I stamped the images on watercolor paper.

I colored the images using the Distress Pens and a watercolor brush. I tore the edge and sponged on distress ink. I used white pigment ink and a snowflake stamp on the background of the Judikins card base.


The toy soldier background is done with the Holly stamp using Pumice Stone ink on a grey/blue Judikins card. I die-cut and layered the Harlequin strip cut from some of Tim's papers.


Tim also offers great embellishments. I love the Tinsel. It comes in several colors. as does the glitter.


If you love Tim and all the Tinsel and such you may want to join the challenge over at Studio L3.
The lovely and generous Joy and her family at Inspiration Emporium sponsor all our odd-numbered challenges and you may be a winner.

And one last picture of a wreath I made using the Scan NCut. I love how I can cut so many snowflakes at once. Hope Santa is good to you.


Hope you are enjoying the season with friends and family.  ttfn

Friday, October 10, 2014

CC3C Distress Photo Tinting - and Halloween


Hi everyone, 
I guess I'm really getting in the spirit of October. I hit the craft store today and there were things on sale I couldn't leave on the shelf. Much of it was Tim Holtz's products, yippee! I came home and headed to the basement to craft and found I had a printers tray. I decided to antique it a bit and turn it into a Halloween wall hanging. 

I used Distress Crackle paint, Distress ink and sprays to achieve the aged effect on the tray. I found some papers in a Tim Holtz stack I liked for the background. After antiquing the edges I glued the paper to the tray.


Once I had achieved the distressed look on the tray, I could stamp and start layering in my embellishments. That's where the fun begins. Goblins and ghosts and pumpkins on my, scary stuff. Lol

Well with all the fun things I have in my stash and the things I found at the craft store I think this is now complete. 


Over on Linda Ledbetter's blog,Studio L3, there is the Compendium of Curiosity challenge going on. You can check it out here. The current challenge is using Distress Photo tinting. my example is in the photo above. The instructions are on page 41 of A Compendium of Curiosities, Vol.3.
 Please be aware that 
entries to this challenge must use the technique as it’s presented in the book.   
If you want to participate, grab your copy of Tim's latest book and follow along.
This week's challenge (Number 12) is sponsored by the generous folks at The Funkie Junkie Boutique.  Tim and Mario also have yet another wonderful prize waiting for the winner of this challenge!


Happy October fun and happy Halloween everyone. I hope you get at least one bonfire and hayrack ride in this month.

Saturday, August 23, 2014

CC3-9 Framelits and Stamps

Hello blog friends
Here we go again. I can't believe this is the ninth challenge already. This week, we’re  using framlits and stamps, which you’ll find on page 63 of A Compendium of Curiosities, Vol. #3
There are so many wonderful sets available and I think I want them all.
Please be sure to review the CC3C F.A.Q. for the rules of this challenge. There aren't many, but they are important.Everyone is welcome to participate, but you must work from your personal copy of A Compendium of Curiosities, Vol. 3.  If you don’t have a copy, you can order one directly from Tim, and he’ll autograph it for you!As with every challenge, there is a winner who will receive a fantastic collection of Tim’s products, courtesy of Tim himself and Mario Rossi, his business manager (a.k.a. Mr. “Behind the Scenes”)!  Odd-numbered challenges are sponsored by the wonderful online shop, INSPIRATION EMPORIUM! Joy and the IE gang will award an incredibly generous FIFTY DOLLAR gift certificate to one lucky, randomly selected participant. So here is my entry.


Monday, August 11, 2014

CC3-8 Faded Layers


Wow folks, August already. It's hard to believe summer is flying by so quickly. I've been helping my daughter with some home repairs. You may have noticed I haven't been around much. With such a rainy spring we had to deal with mold.  We stripped everything down to bare bones sanded floors, painted walls, need I say more. I am one pooped pup.

Right now, though, it’s time for Challenge #8 in our journey through the latest book by Tim Holtz. The Curiosity Crew over at Studio L3 got their grunge on with Tim’s Faded Layers technique. Go grab your copy of the A Compendium of Curiosities, Vol.3, turn to page 58, and join in! 
you can order one directly from Tim, who will be glad to autograph it for you! If you have any questions about the challenge in general, check out the CC3C F.A.Q. here
Tim and Mario will have a nifty prize package for one lucky participant.
The Funkie Junkie Boutique
The Funkie Junkie Boutique is back to sponsor Challenge 8, and lovely owner Linda Coughlin has $25 shopping spree to one very lucky CC3Cer.
So let me show you what I did. 
I then layered on Tim's Holly Bough stencil and used archival ink on a blending pad to color through the openings. I used fern-green, leaf-green, jet-black and carnation-red archival ink. 
I colored a piece of crinkle ribbon with distress stain. and let it dry. Then I stamped the Christmas tree from the blueprint framelit set three times on Ranger watercolor paper and colored them with distress markers using a detail water brush. I stamped and colored the sentiment from the same set and cut all the pieces using my Vagabond with the magnetic base plate. It was so easy. I distressed the edges if these pieces with Gathered Twigs ink.
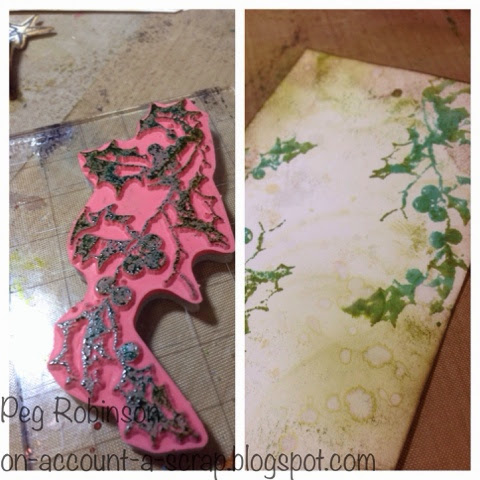
I cut a 3x5  piece of paper and inked the holly stamp from the Christmas time stamp set from Stampers Anonymous using Pine Bough and Pealed Paint. I spritzed the stamp and applied it to the paper for a watercolor look. Then I distressed the edges with the same inks and some Gathered Twigs for the brown. Then it was a quick spritz and flick of water to distress the surface. Oooo love that!
I cut a 12X12 piece of paper from the Wallflower collection in half and adhered them together. Using the Gathered Twigs ink, I distressed the edges of the card base. 

Now to assemble the pieces. I wrapped the ribbon around the faded layers piece where the design for the holly ended and tied a bow. This had been trimmed to 5.5 X 5.5 inches. I layer that onto the card and add the watercolor holly card, sentiment and layered tree. All that leaves is the star on top. I colored that using Sunshine and Cranberry alcohol inks.


Well I hope you enjoyed seeing my process. Be sure to check out the other blogs. There is some amazing inspiration there. ttfn 

Sunday, July 06, 2014

CC3-Challenge 6-Altered Burlap Panel


Hi blog friends,
I am really pumped about doing this challenge from Linda Ledbetter and crew. I love getting all messy and digging through my supplies to see what I can use to create a piece to meet a challenge. The photo was the first thing that spoke to me. Everything else plays off that focal piece.
My Canvas
Challenge 6 introduces Tim’s Altered Burlap Panel Technique, which you’ll find on page 37 of A Compendium of Curiosities, Vol. #3 (a.k.a “CC3″). I had all kinds of fun with this one, because I was able to get grungy and make it my own: Incorporate memorabilia that’s meaningful to you. I found an old photo of my aunt and uncle in wedding attire. I just wanted to incorporate that photo into my canvas. Please do note that you must use one of Tim’s Burlap Panels in your project in order to link to this challenge. I used a District Market burlap 12X12 canvas.
Everyone is welcome to participate in the CC3C, but you must work from your personal copy of the CC3. We will not be posting technique instructions on our blogs. This out of respect and appreciation for all the work Tim invested in writing the book. If you don’t have a copy, you can order one directly from Tim, who will be glad to autograph it for you! If you have any questions about the challenge in general, check out the CC3C F.A.Q. here.

District Market 12X12 Canvas
So I will show you some close up photos of my canvas in different stages of completion. I was able to use some Art Parts and embossing paste from Wendy Vecchi. I absolutely can not say enough about the quality of these products. I was also very happy to find the District Market canvas has a solid backing so you can easily attach things to the canvas without sagging. It was still easy to punch through the panel with an awl to attach brads.
 
Picking out addition for my canvas
I was also able to use one of Tim's new stencils with the embossing paste. Love it!
Adding texture and color


So I hope you have Tim's book and can see how great his step by step walks you through the process.

Here is my finished piece. I hope you enjoyed seeing what I did. Be sure to go check out the crew and see all the talented artists creations.
The Funkie Junkie Boutique is back to sponsor Challenge 6, and lovely owner Linda Coughlin is offering a fabulous $25 shopping spree to one lucky CC3Cer! For a chance to win, link your project to the challenge page. Tim and Mario also sponsor each challenge with a great package. They are always so supportive. Well, that's all for today. Hope you had a good 4th for my American friends and happy Canada Day for my friends up north. 


Monday, June 23, 2014

CC3-5-Distressed Watercolor

Here we go again. I can't believe this is the fifth challenge already. This week, we’re rockin’ the Distress Watercoloring, which you’ll find on page 39 of A Compendium of Curiosities, Vol. #3
Before you link up your own amazing creation, please be sure to review the CC3C F.A.Q. for the rules of this challenge. There aren't many, but they are important.
Everyone is welcome to participate, but you must work from your personal copy of A Compendium of Curiosities, Vol. 3. Please do not  post technique instructions on your blogs. This is required out of respect and appreciation for all the work that Tim Holtz invested in creating this book. If you don’t have a copy, you can order one directly from Tim, and he’ll autograph it for you!
As with every challenge, there is a winner who will receive a fantastic collection of Tim’s products, courtesy of Tim himself and Mario Rossi, his business manager (a.k.a. Mr. “Behind the Scenes”)! To be eligible to win this prize package, you must visit each of  the team members’ blogs and leave a comment there.

 Odd-numbered challenges are sponsored by the wonderful online shop, INSPIRATION EMPORIUM! Joy and the IE gang will award an incredibly generous FIFTY DOLLAR gift certificate to one lucky, randomly selected participant. All you need to do to be eligible is link your project, and mention Inspiration Emporium in your blog post. You can also get 10% off any order with the code STUDIOL3!!!


I have a wonderful friend who happens to have a firecracker birthday coming up. Yup, you guessed it, she was born on the fourth of July. I just started making these popup box cards and thought that would be great for her birthday theme.
I started with Tim's mini Blueprints 2 stamp set.
I created the fold up box card base, and started adding the water-colored elements. I used papers from Tim's water color distress, Lost and Found and Laboratorie paper stashes. I built a structure inside of the box so I could load it up with the big surprise popouts.

inside of box card
I cut clear packaging to mount to so it appears that the images are floating in the air.


clear packaging supports
I painted some Wendy Vicchi Art Parts stars with Distress paint and mounted them on the front flap.


I love the watercolored element sprinkled throughout the card pieces. I added a few die cut pieces along with Tim's cool crackle looking stars.

Adding elements


I had a great time creating a fun birthday surprise with all of the cool stuff Tim has designed. I hope you get his book and join in the fun. It definitely gets my mojo working.


Sunday, May 25, 2014

12 tags of 2014-May

Hello my blogger friends,
Here we are at the end of May and I realized I hadn't created to tag for May yet. This month Tim Holtz challenges us to take out all of our trinkets and use them.  All I can tell you is I have plenty of trinkets and yes, I am a hoarder of all things crafty. I have gotten better about pulling them out of the packaging and using them in the last year, but I'm always worried about not having what I need later, which is silly because I can always go and get it.  It's not like I live in the wilderness and there are no stores around. Additionally I can find things on the Internet and have it to my home in two days. I'm making a pledge to myself that I'm going to use my stash. 

Here's a peek at what I've done. I especially love metal. If you're not familiar with Tim's trinkets you need to check them out. I have a system for all of my packaging. I typically keep things in a 12 x 12 container until they're opened. 

Once they've been opened I placed them in these boxes I found at the secondhand store to store all of the loose items. They are like ones Tim sells. They fold out to display all the goodness inside.


unfolded to show inside


I've decided I'm not going to get any more of these boxes. I'm going to use what I have and replace things as needed. Check back with me next year and see how that goes. Lol

Anyway I had fun using trinkets out of my boxes today. 


Be sure stop by Tim's blog and see all of the tags that were created this month by fellow crafters and of course, the Masters too. I hope you're all having a great weekend. Thanks for stopping by.
Supplies:
Idea-ology Products-Mini gears, pen nibs, regal adornments, word bands, spinner, film strip, crinkle ribbon, bulb, and stars.
Distress Ink-Peeled paint, iced spruce, evergreen bough, gathered twigs.
Papers-Labels, grunge and paper stash.
Alterations-Mini feather and ink well.
Embossing-Springtime texture fade.