Right now, though, it’s time for Challenge #8 in our journey through the latest book by Tim Holtz. The Curiosity Crew over at Studio L3 got their grunge on with Tim’s Faded Layers technique. Go grab your copy of the A Compendium of Curiosities, Vol.3, turn to page 58, and join in!
you can order one directly from Tim, who will be glad to autograph it for you! If you have any questions about the challenge in general, check out the CC3C F.A.Q. here
Tim and Mario will have a nifty prize package for one lucky participant.

The Funkie Junkie Boutique is back to sponsor Challenge 8, and lovely owner Linda Coughlin has $25 shopping spree to one very lucky CC3Cer.
So let me show you what I did.

I then layered on Tim's Holly Bough stencil and used archival ink on a blending pad to color through the openings. I used fern-green, leaf-green, jet-black and carnation-red archival ink.

I colored a piece of crinkle ribbon with distress stain. and let it dry. Then I stamped the Christmas tree from the blueprint framelit set three times on Ranger watercolor paper and colored them with distress markers using a detail water brush. I stamped and colored the sentiment from the same set and cut all the pieces using my Vagabond with the magnetic base plate. It was so easy. I distressed the edges if these pieces with Gathered Twigs ink.

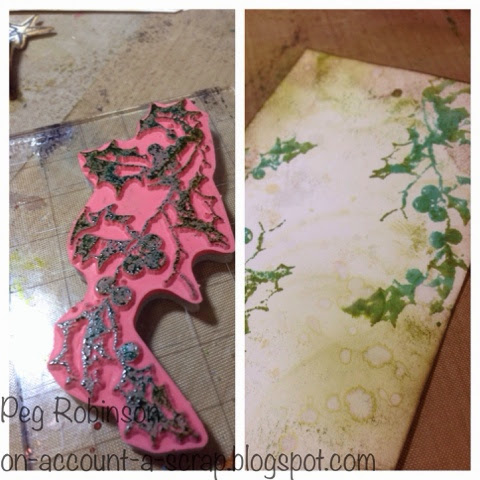
I cut a 3x5 piece of paper and inked the holly stamp from the Christmas time stamp set from Stampers Anonymous using Pine Bough and Pealed Paint. I spritzed the stamp and applied it to the paper for a watercolor look. Then I distressed the edges with the same inks and some Gathered Twigs for the brown. Then it was a quick spritz and flick of water to distress the surface. Oooo love that!
I cut a 12X12 piece of paper from the Wallflower collection in half and adhered them together. Using the Gathered Twigs ink, I distressed the edges of the card base.

Now to assemble the pieces. I wrapped the ribbon around the faded layers piece where the design for the holly ended and tied a bow. This had been trimmed to 5.5 X 5.5 inches. I layer that onto the card and add the watercolor holly card, sentiment and layered tree. All that leaves is the star on top. I colored that using Sunshine and Cranberry alcohol inks.


Well I hope you enjoyed seeing my process. Be sure to check out the other blogs. There is some amazing inspiration there. ttfn
No comments:
Post a Comment